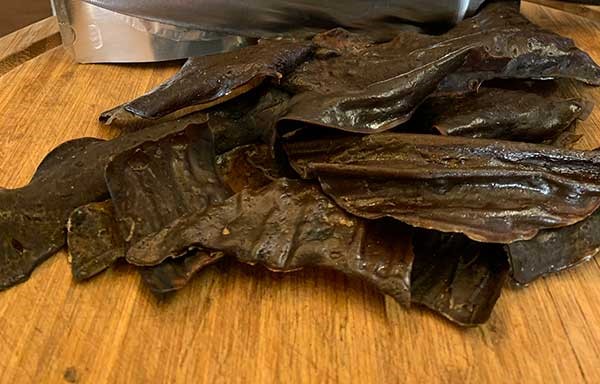
Did you know that beef liver is a nutrient powerhouse, packed with protein, vitamins, and minerals? While it might not top everyone’s list of favorite foods, turning it into crispy, dried treats can make it a tasty snack for humans or even a wholesome treat for pets. If you’ve ever wondered how to make beef liver dried crisps, this guide is your go-to resource.
Preparing beef liver crisps at home has its perks. You control the ingredients, ensuring they’re all-natural and free from preservatives. Plus, it’s surprisingly simple! Whether you’re looking for a protein-packed snack or a healthy reward for your furry friend, this process delivers.
In this guide, we’ll walk you through the step-by-step process to create perfect beef liver crisps, from sourcing fresh liver to storing the final product. Get ready to learn tips, tricks, and troubleshooting solutions for a seamless experience.

Step-by-Step Instructions
Step 1: Gather Your Supplies and Ingredients
- What to Do: Collect all necessary tools and fresh beef liver.
- How to Do It:
- Ingredients: Fresh beef liver (approximately 1–2 pounds) and optional seasonings like garlic powder (avoid seasonings if making pet treats).
- Tools: A sharp knife, cutting board, parchment paper, baking tray, or dehydrator.
- Consider gloves for handling the liver.
- Why It Matters: Having everything prepped saves time and ensures you don’t miss any crucial steps.
Pro Tip: Choose fresh, organic beef liver for the best flavor and nutritional benefits.
Step 2: Prep the Beef Liver
- What to Do: Clean and slice the liver.
- How to Do It:
- Rinse the liver under cold water to remove any residue.
- Pat dry with a paper towel.
- Use a sharp knife to slice the liver into thin strips, about 1/4 inch thick.
- Why It Matters: Thin, even slices ensure consistent drying and a crisp texture.
Pro Tip: For easier slicing, freeze the liver for 15–20 minutes beforehand.
Step 3: Preheat and Prepare Your Equipment
- What to Do: Set up your oven or dehydrator.
- How to Do It:
- Oven Method: Preheat to 180°F (or the lowest setting).
- Dehydrator Method: Set the dehydrator to 160°F.
- Line your trays with parchment paper to prevent sticking.
- Why It Matters: Proper preparation prevents the liver from sticking and ensures efficient drying.
Pro Tip: Use an oven thermometer to verify the correct temperature if using an oven.
Step 4: Arrange and Dry the Liver Strips
- What to Do: Lay out the slices for drying.
- How to Do It:
- Arrange the liver slices in a single layer on the trays. Avoid overlapping pieces.
- Place the trays in the oven or dehydrator.
- For ovens, leave the door slightly ajar to allow moisture to escape.
- Why It Matters: Proper spacing and airflow are essential for even drying.
Pro Tip: Flip the slices halfway through drying to ensure crispiness on both sides.
Step 5: Monitor and Check for Doneness
- What to Do: Observe the drying process.
- How to Do It:
- For dehydrators, drying takes 6–8 hours.
- In ovens, it may take 3–4 hours.
- The liver is ready when it’s dry, brittle, and snaps easily.
- Why It Matters: Over-drying can lead to overly hard crisps, while under-drying risks spoilage.
Pro Tip: Test a piece after cooling to confirm the texture.
Step 6: Cool and Store the Crisps
- What to Do: Let the crisps cool completely before storing.
- How to Do It:
- Once cooled, store the crisps in an airtight container.
- For long-term storage, use vacuum-sealed bags or freeze the crisps.
- Why It Matters: Proper storage ensures the crisps remain fresh and safe to eat.
Pro Tip: Label the container with the preparation date for easy tracking.
Troubleshooting & Additional Tips
Common Issues & Fixes
- Crisps Too Chewy: The liver wasn’t dried enough. Return the slices to the oven or dehydrator for an additional hour.
- Burnt Pieces: The temperature was too high. Use the lowest setting to prevent this issue.
- Uneven Drying: Ensure slices are uniform in thickness and not overcrowded on the trays.
Best Practices for Perfect Liver Crisps
- Always use fresh liver for the best flavor and texture.
- Avoid adding salt or strong seasonings if making pet treats.
- Check your equipment periodically to ensure consistent drying.
FAQs about How to Make Beef Liver Dried Crisps
1. How long do beef liver dried crisps last?
When stored in an airtight container in a cool, dark place, they can last up to 2 weeks. Freezing extends their shelf life to several months.
2. Can I use other types of liver?
Yes, chicken or pork liver can also be dried, but the drying times may vary.
3. Is it safe to add seasoning?
For human consumption, light seasonings like garlic powder are fine. Avoid seasonings if making pet treats, as some spices are harmful to animals.
4. Why is my liver sticky after drying?
Sticky texture indicates insufficient drying. Extend the drying time to remove remaining moisture.
5. Are beef liver dried crisps healthy?
Yes! Beef liver is a nutrient-rich superfood, packed with vitamins A, B12, and iron.
6. Can I use a microwave to make liver crisps?
Microwaves are not recommended, as they don’t provide the even, low-temperature drying needed.
Conclusion
Making beef liver dried crisps at home is not only cost-effective but also incredibly rewarding. You now know how to make beef liver dried crisps from start to finish, ensuring they’re crispy, nutritious, and free from artificial ingredients. Whether you’re whipping up snacks for yourself or treats for your furry companions, this process delivers reliable, delicious results.
So, grab some fresh beef liver, fire up your oven or dehydrator, and enjoy the satisfaction of crafting your own healthy snacks. Don’t forget to share this guide with others who might appreciate a homemade, wholesome treat!
